
MITCHEL SMITH -
TECHNICAL DESIGNER
Video 1: Demonstration of Dark Presents On Christmas' gameplay
Dark Presents On Christmas
Dark Presents On Christmas is a first-person survival horror game prototype I independently developed using Unreal Engine 4 over the course of nine days as a part of the application process for applying to the Florida Interactive Entertainment Academy. The game is about a young boy on Christmas Eve who wants to take a sneak peak at his presents before the big day. However, a mischievous creature has cursed his presents to only be visible within the light and has tasked the boy to collect the presents before the creature catches him. Within the game, the player traverses the level and utilizes their flashlight to reveal and collect the presents without getting caught by the creature. Once the player collects all of the presents, then the exit to the level opens up, and the player must then leave the level without being caught. If the player is caught, then they lose the game and must restart.
Background by Akipi on Pixabay.com.
Project Contributions
-
Technical Design
-
Programming
-
Game Design
-
Level Design
-
Documentation
Note 1: In regard to art, the only original assets created for the game include the map layout, the dimensions of the walls, floors, and ceilings, and the flashlight mesh, which I created as a proxy asset. More detailed information on the art sources can be found in the google document linked here.
Note 2: As I utilized this project to learn about Unreal Engine's AI, I followed a few online tutorials to gain an understanding of UE4's AI and then built off of the tutorial code to make it function for the purposes of the project's design. Tutorial code will be included for context, but all tutorial code will be labeled as such on their respective images.
Development Process
To begin, I first brainstormed game concepts, appropriate audiences to design for, an effective hook to streamline game decisions, the tone of the game, and what the basic narrative for the game would be.
After brainstorming, I made a list of the required mechanics, systems, and tasks that would need to be completed in order to finish the project. Once the tasks were determined, I organized them based on what needed to be completed first. In addition to this, I created a schedule that showcased what tasks needed to be completed on which days. Aside from tasks, I researched asset packs from the Epic Games Store that I could utilize for textures and meshes, as the emphasis for this project was not on my art skills but instead on showcasing my game and technical design skills.
With the brainstorming and planning completed, I began to research how to implement the mechanics and systems that I did not know how to program. The first mechanic I began to program was the flashlight mechanic, which I prototyped alongside the AI for the main enemy and the presents functionality. Once the AI and flashlight were prototyped, I programmed the menu UI and functionality. At this point, I sketched out the level layout and created it in-engine. When the layout was finalized, I began to populate the environment with assets.
While prototyping and populating the level, I began to rework the scope for the game by cutting or reducing mechanics that I believed that I would not have enough time to implement properly. For instance, I reduced the number of presents that the player was required to gather from 15 to 5 presents, and I reduced the number of spawn locations of the presents from 30 to 15.
Once the level was set dressed, I added the prototype enemy, player character, and presents into the level in order to playtest how these elements interacted with each other and the completed level. Based on information I gathered from playtesting, I iterated on the mechanics and systems where needed. After iterating on the game’s mechanics and systems, I conducted one final playtest and then created the final game build.
Skills Learned
-
Independently plan and develop a game project.
-
Minimize scope and maximize time efficiency for fast-paced project development.
-
Dynamically reduce scope, based on a game's current development progress, through removing unnecessary mechanics and systems as required to meet a set deadline.
-
Develop artificial intelligence behavior trees for task-based ai decision-making.
-
Implement nav mesh navigation.
-
Utilize AI senses for enemy-player interaction.
-
Assign blackboard key values across AI blueprints.
The Flashlight
The flashlight needed to be one of the first mechanics completed for the game, as the primary gameplay heavily depended on it. Adding the flashlight base and light source as a child component of the player character, the entirety of the flashlight's code is set within the player character's blueprint.
Within the game, players click the left mouse button to set the visibility of the flashlight's light source, with each click setting the visibility to either on or off. When the light is on, the flashlight produces a Sphere Trace By Channel that identifies the objects the light is touching. In order to better simulate the light shine being the cause of changes in the environment, I set the distance of how far out the sphere trace will travel to the attenuation radius of the light.
When the sphere trace hits an object, it checks if the object is a Light Actor, which is either a present or the enemy, by looking for the tag "Light Actor." If the actor in the light is a Light Actor, then it will check if the actor is a present. If so, the Light Interaction Interface on the Present Blueprint that sets the visibility of the present to true is called.
If the actor is a Light Actor but not a present, then the code determines that the actor must be the enemy, so it calls the Light Interaction Interface on the Enemy's Blueprint that results in the enemy targeting the player. If the actor the light is touching is not a Light Actor, then the Light Interaction Interface on the Present Blueprint is called and sets the visibility of the present to false, as the light is no longer touching a present.
When the flashlight is clicked off, the Sphere Trace By Channel is turned off. If the last actor being hit by the light was a present, then the Light Interaction Interface sets the present's visibility to false. This ensures that the present's visibility is always turned off when not within the flashlight's beam.


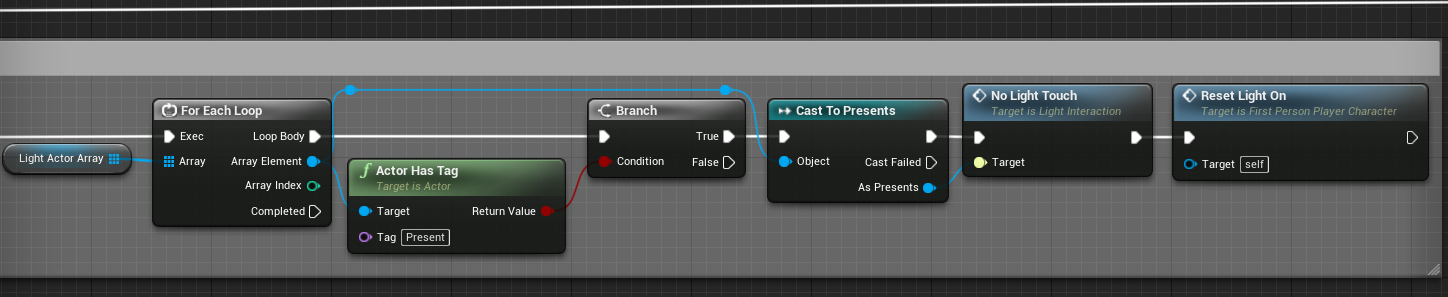


Gallery 1: Flashlight Code
The Presents
Acting as the main objective of the game, the presents needed to be implemented as soon as the flashlight was operational. In programming the presents, I had decided to add further replayability and variety to the game by not only including random spawn locations from an array of positions but also four randomly-selected static meshes that would be set to each present as they spawned.
As stated above, when the level begins, the spawn locations of all of the presents are shuffled within their array and then randomly assigned to each present as they are spawned in. After each present is spawned in, the index for that spawn location is removed from the array, ensuring that presents are not spawning at the same location as other presents. As a result, the size of the array is also reduced by one, which allows the For Each Loop to end once the final index is removed.
When each present is spawned into the level, the available static meshes for the presents are placed into an array, where one static mesh is randomly selected and then set to the spawned present's static mesh value.
In regard to the present's reaction to light, when the flashlight is shone on the present, it checks whether the current present is both visible and able to be picked up by checking the Visible and Pick Uppable Booleans. For the Visible bool, its value is set when the Light Interaction Interface is called by the flashlight after the flashlight determines whether the light is touching the present or not. With the Pick Uppable bool, this value is set when the player collides with the present's Interaction Sphere Collision.
If both bools are true, then the in-game Interaction text HUD element is displayed on the screen and lets the player know to press "E" to pick up the present. Additionally, the Interact Boolean is set to true. If one or neither of the bools are true, then the in-game Interaction text remains off of the screen, and the Interact bool is set to false.
When the player presses the Interact Key (E), a branch checks if the Interact bool is set to true. If true, the counter for the number of presents collected increases in both the UI and the Present Count Integer variable. In addition to this, the collected present is destroyed. If the current Present Count equals the value required in the Max Present Count Integer variable, then the Objective UI text is changed, and the exit to the level is opened.


Gallery 2: Presents Code
The AI
The final piece that would complete the gameplay is the AI for the creature. Having never programmed an artificial intelligence before, I spent several hours researching, following tutorials, practicing, and testing before the final version of the AI was created.
A tutorial was utilized to set up the blackboard, behavior tree, and ai sensing functionalities. Utilizing a blackboard and behavior tree, whether the player is seen by the enemy is checked by the behavior tree through the CanSeeTarget Boolean blackboard key. Based on whether the AI perception successfully senses the player using its AISense_Sight, the CanSeeTarget blackboard key is set to true or false, which determines the enemy's next functionality on the behavior tree.
If the key is set to true, then the Chase Player tree is utilized, resulting in the enemy determining the player's current location and then moving itself to that location. When the CanSeeTarget key is set to false, meaning the enemy cannot see the player, the Patrol Area tree is used instead. This tree gets random locations on the navmesh and moves the enemy to those locations, simulating the enemy patrolling the level in an unpredictable manner.
When the flashlight touches the enemy and calls the Light Interaction Interface on the enemy, the CanSeeTarget blackboard key is set to true. This leads to the enemy stopping their patrol and beginning to chase the player. Once the player is no longer in range of the enemy's sight and is no longer shining their light on the enemy, then the CanSeeTarget key is once again set to false, forcing the enemy to begin patrolling once more.
If the player collides with the enemy's Death Sphere Collision, then the game is paused, the Lose Widget is added to the viewport, and the player's mouse becomes usable to traverse the new Lose Screen.


Gallery 3: AI Code